Vacuum Maintenance 101: Make Your Budget Vacuum Last
Budget vacuums last 5–8 years with regular maintenance — emptying the bin after every use, cleaning filters every 3–6 months, removing hair from the brush roll, and checking belts for wear.
You bought a budget vacuum, and six months later it sounds like it's dying and barely picks up crumbs. That frustration almost always comes down to skipped maintenance, not a bad machine. Maintenance specialists at MetroVac confirm that with regular upkeep, many vacuums can run strong for 5–8 years under normal household use. The fix isn't buying something more expensive. It's spending five minutes a week on the vacuum you already own.
A budget vacuum's motor depends entirely on clean airflow to stay cool and run efficiently. Clogged filters and overfull bins force it to work harder on every pass, generating more heat and wearing out components faster. Airflow is everything when it comes to vacuum longevity, and maintaining it costs you nothing but a few minutes.
This guide covers the exact maintenance schedule, troubleshooting steps, and the repair-vs-replace math that tells you when to stop fixing and start shopping, no matter what type of vacuum you own. You'll also find out which vacuum warranty terms you might be voiding without realizing it.

Why maintenance matters more for budget vacuums
Budget vacuums in the $40–$200 range rely on lighter-duty motors, thinner plastic housings, and fewer protective features than their premium counterparts. Every skipped filter cleaning or overfull dust bin hits them harder. A clog can cause a budget motor to overheat and trigger a safety shutoff, but that vulnerability isn't a design flaw you should accept. It's a maintenance problem you can solve.
Maintenance specialists at MetroVac state that with regular upkeep, many vacuum cleaners can last 5–8 years under normal household use. That number applies across price points. Neglected maintenance is a top reason affordable vacuums end up in a landfill before their time.
Airflow determines how long any machine lasts. When filters clog, bins overflow, or brush rolls tangle with hair, the motor compensates by spinning harder and running hotter. You're not just losing suction — you're actively shortening the motor's life every time you vacuum with a dirty filter.
Premium machines aren't immune to this math, either. MetroVac notes that even high-end vacuums often become uneconomical to maintain after 7–10 years, depending on usage. Keeping a budget vacuum running strong for years through basic care narrows the gap with machines that cost far more. That's real money saved, and it also means you're less likely to void your vacuum warranty coverage by letting preventable damage pile up.
The maintenance itself isn't complicated or time-consuming. You're looking at a few minutes per week and a filter swap a couple of times a year. The rest of this guide breaks down exactly what to do and when.
The 5-minute pre-use checklist that prevents most problems
Five quick checks before you flip the switch can prevent the most common vacuum failures: loss of suction, overheating, and brush roll damage. None of these take more than a minute on their own, and together they form a habit that keeps your machine running the way it did on day one.
Inspect the power cord
Run your hand along the entire length of the cord and look for kinks, cuts, or any spot where the outer insulation has worn through. Damaged cords should be replaced before your next session for safety. This applies to corded uprights and canisters. If you're using a cordless stick vacuum, skip this step and move to the dust bin check.
Check the dust bin or vacuum bag level
Your dust bin should never be past the max fill line before you start vacuuming. For bagless models, Consumer Reports recommends emptying the dirt container after every use, not when it looks full. If you're using a bagged vacuum, swap in a fresh vacuum bag when the current one reaches about half to two-thirds full. Fine dust particles block airflow long before the bag looks stuffed, so waiting until it's completely packed means you've been losing suction for a while already.
Visually inspect the vacuum filter
Pull out your primary filter and hold it up to the light. A clean filter looks close to its original color and lets light pass through. If it's visibly gray, matted, or coated in dust, either wash it (if it's a washable foam or felt type) or swap it out before you vacuum. Running a dirty filter reduces pickup and adds unnecessary wear to the motor. You'll know it's time for a deeper look at your HEPA vs. HEPA-type filter options when cleaning alone stops restoring airflow.
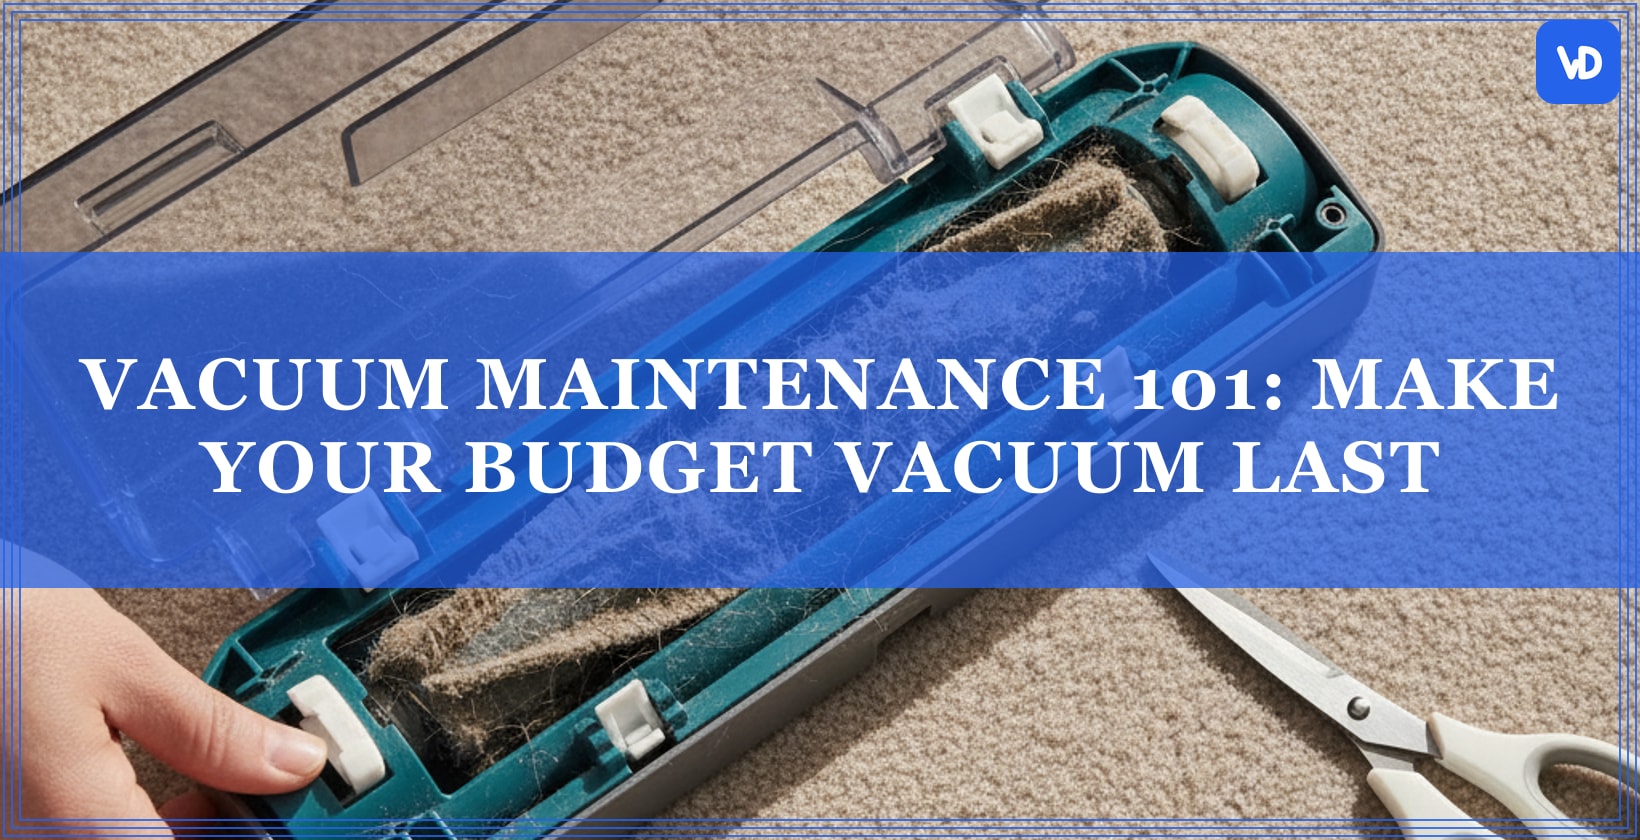
Spin the brush roll by hand
Turn the vacuum over and give the brush roll a spin with your fingers. It should rotate freely without resistance. If hair, string, or thread has wrapped around the bristles or the end caps, that tangle is grinding against the bearings and straining the belt each time you vacuum. A quick snip with scissors clears most wraps in under 30 seconds. Any stiffness means something is caught.
Do the credit-card test on the bristles
Hold a credit card or driver's license flat across the vacuum's baseplate. If the brush roll bristles make contact with the edge of the card, they're tall enough to agitate carpet fibers properly. If the bristles don't reach the card, they've worn down too far and the roller needs replacing. This 10-second test tells you more about your vacuum's cleaning ability than any amount of guessing. It's the easiest way to catch a worn-out brush before it starts leaving debris behind on every pass.
Turn this checklist into a reflex (cord, bin, filter, brush, bristle height) and you'll catch small problems before they become expensive ones. Most vacuum failures that happen in the first two years trace back to one of these five things being ignored repeatedly, not to a single catastrophic event.
One more thing before you start each session: pick up power cords, rug fringes, socks, and any debris larger than what the intake can handle. A cord caught in the brush roll can snap the belt in a single pass, and rug tassels wrap around the roller instantly. Two seconds of floor prep prevents real damage and downtime.

Monthly and seasonal maintenance schedule
A simple recurring schedule keeps your vacuum running at full power without requiring you to remember every task from memory. The table below breaks maintenance into five intervals, from every few months to annually, so you can set calendar reminders and forget about it until they pop up.
Frequency | Task | Why it matters |
|---|---|---|
Weekly | Cut tangled fur and debris from the brush roll with scissors; wipe down the vacuum's exterior with a damp cloth | Tangled fibers grind against bearings and strain the vacuum belt that drives the roller. A weekly clearing keeps the roll spinning freely and prevents premature belt wear. |
Every 1–3 months | Wash or rinse washable foam and felt vacuum filters under cool water; air-dry completely for 24 hours before reinstalling | Owner's manuals from brands like Bissell specify full drying before reinstalling filters. A damp filter restricts airflow just as badly as a dirty one and can damage the motor. |
Every 3–6 months | Deep-clean or replace all filters per your manufacturer's guidelines, including any post-motor HEPA filter cartridge | MetroVac recommends filter service every 3–6 months; Denver Vacuum Store recommends 6–12 months based on filter type and how often you run the machine. Pet owners and daily users should stay on the shorter end. If you're unsure whether your machine uses a true HEPA filter or a HEPA-type filter, check the manual. The replacement schedule and washing rules differ between the two. |
Every 6–12 months | Inspect the drive belt for stretching, cracking, or glazing; check hoses and attachments for clogs or cracks | A stretched belt lets the brush roll slow down gradually, so you lose cleaning power without an obvious warning sign. Replacing a worn belt is one of the cheapest fixes available. Ignoring it can burn out the motor. |
Annually | Perform a thorough inspection of all moving parts, seals, and electrical connections; consider a professional tune-up for heavy-use households | Mars Discount Vacuum recommends annual inspections to catch minor problems before they become expensive failures. MetroVac suggests professional tune-ups every 12–24 months depending on usage. |
Adjusting the schedule for your household
These intervals assume average use — a few sessions per week in a home without pets. If you have dogs, cats, or anyone with long hair, shift every interval one step shorter. Your filter wash becomes more frequent, and your 6-month belt check moves to every 3–4 months.
Seasonal deep cleans are worth building into your routine, too. Spring and fall are natural checkpoints because shedding pets, tracked-in mud, and holiday hosting all spike debris volume. Use those transitions to do a full filter swap, belt inspection, and hose check in one sitting.
One rule that prevents most mistakes
Never reinstall a filter that's still damp. A damp filter restricts airflow and can promote mold growth inside the housing. If you wash your filters on a Saturday morning, don't plan to vacuum until Sunday evening at the earliest. Owning a spare set of filters lets you swap in a dry set immediately and wash the dirty ones on your own timeline.
Stick to this schedule and you'll catch worn belts, clogged hoses, and degraded filters long before they force the motor into an early retirement.
Bagged vs bagless vs cordless vs robot: maintenance compared
Each vacuum type has a different maintenance burden, and picking the wrong one for your lifestyle means you'll either overspend on consumables or skip upkeep because it feels like too much work. The table below breaks down what each design actually demands from you on a regular basis.
Vacuum Type | Bin/Bag Care | Filter Care | Brush & Moving Parts | Unique Maintenance Needs | Ongoing Cost |
|---|---|---|---|---|---|
Bagged upright or canister | Check bag before each use; replace when ½–⅔ full (Denver Vacuum Store, citing manufacturers) | Replace post-motor filter every 6–12 months; some models have a washable pre-motor filter | Weekly brush roll hair removal; belt inspection every 6–12 months | None beyond standard care — the simplest overall routine | Bag packs are an ongoing purchase; less frequent emptying offsets cost somewhat |
Bagless upright or canister | Empty the dirt bin after each session (Consumer Reports recommendation); never exceed the max fill line | Wash foam or felt pre-motor filters every 1–3 months; replace or deep-clean all filters on a 3–6 month cycle | Same brush roll and belt schedule as bagged models | Periodic bin washing with mild detergent to prevent odor buildup | No bag purchases, but filters need more frequent attention. Net savings if you stay on schedule |
Cordless stick vacuum | Same as bagless: empty after each session, since smaller bins fill faster | Identical filter washing and replacement schedule as bagless uprights | Brush roll cleaning weekly; most cordless sticks use direct-drive motors instead of user-replaceable belts | Battery health management: keep the bin and filters clean to reduce motor strain, which helps preserve battery cycle life over time | No bags; filters are inexpensive. Check your model's replacement battery cost before buying, since that can vary widely by brand |
Robot vacuum (including Roomba models) | Empty the dustbin after every run, or after every 1–2 runs with a self-emptying dock; dock bags still need periodic replacement | Clean or replace filters every 3–6 months. Robots run more frequently than manual vacuums, so filters load up faster | Remove fur and hair from the main brush and side brushes every 1–2 weeks; replace side brushes periodically as bristles wear down | Wipe cliff and navigation sensors with a dry cloth regularly; clean the front caster wheel of hair and debris periodically; wipe charging contacts on both the robot and dock; clean dirty-water tanks and dock trays on mop-capable models regularly | Side brushes, filters, and dock bags add up. Check your model's recommended replacement schedule to estimate annual consumable costs |
Picking the right type for your maintenance tolerance
Bagged vacuums demand the least day-to-day attention. You check the bag, vacuum, and move on. The tradeoff is buying replacement bags, but you're emptying far less often than with any bagless design. For a deeper look at how uprights and sticks compare beyond maintenance, the upright vs stick vacuum comparison covers cleaning performance differences.
Bagless uprights and cordless stick vacuums share nearly identical filter and bin routines, but cordless models add battery care to the list. Keeping filters clean reduces the load on the motor, which indirectly protects battery longevity too.
Robot vacuums have the longest maintenance checklist of any type. Sensors, caster wheels, side brushes, and dock contacts all need regular attention on top of standard bin and filter care. If you're considering a budget robot for pet hair, check whether the ongoing parts cost fits your budget before buying. The robot vacuums for pet hair under $200 breakdown covers which models keep consumable costs reasonable.
No vacuum type is maintenance-free, but matching the upkeep style to your habits is the difference between a machine that lasts years and one that dies in months.
How to troubleshoot the 5 most common vacuum problems
Most vacuum issues trace back to one of five symptoms, and you can diagnose all of them at home without any tools beyond scissors and a flashlight. Work through each one in order. The fix is usually simpler and cheaper than you'd expect.
Loss of suction
Weak suction is the single most frequent complaint, and it almost always points to an airflow restriction somewhere between the intake and the motor. Start by checking the dust bin or bag. If it's past the fill line, empty it and test again. Next, pull out every filter in the machine and inspect them. A gray, matted filter chokes airflow even if the bin is empty.
Clogs are the next suspect. Detach the hose and shine a flashlight through it end to end. Check the intake port where the hose connects to the vacuum body, too; small objects and compressed dust love to lodge there. Verify your height adjustment matches your floor type. Running the vacuum head too high above carpet creates a gap that reduces pickup, and too low on hard floors can restrict airflow entirely. Denver Vacuum Store's troubleshooting guidance lists incorrect height settings as one possible cause of poor cleaning performance. To understand how suction is actually measured and what numbers matter, the vacuum suction power guide breaks it down.
Brush roll not spinning
Flip the vacuum over and look at the roller first. Hair, string, and thread wrapped around it or its end caps create enough drag to stop it completely. Cut the tangle away with scissors and spin the roller by hand. It should turn freely with no resistance.
If the roller is clear but still won't spin, the belt is the likely culprit. A stretched, cracked, or snapped belt can't transfer power from the motor to the brush. Pull the baseplate off (most budget models use a few Phillips screws) and check the belt's condition. One more thing to rule out: some vacuums have a physical brush roll switch or a button that toggles the roller on and off for hard-floor mode. Make sure it's actually engaged before assuming something is broken.
Overheating and shutting off
Your vacuum cutting out mid-use is a thermal protection feature, not a random failure. The motor overheated because it couldn't move enough air to cool itself, and the machine shut down to prevent permanent damage. Unplug it immediately and let it cool completely before doing anything else.
Check the entire airflow path while the machine cools. Look for blockages in the hose, intake port, and brush head cavity. Pull out the filters and inspect them. A clogged filter is the most frequent trigger for overheating on budget machines. Once you've cleared every obstruction and confirmed the filters are clean, restart the vacuum. If it shuts off again with clear airflow paths, the motor itself may be failing, and you're facing a repair-vs-replace decision.
Bad odors
A vacuum that smells bad is telling you something is rotting, molding, or decomposing inside it. The usual causes are a dirty dust bin that hasn't been washed, neglected filters harboring trapped moisture, or debris that was damp when you vacuumed it up.
Remove the bin and wash it with warm water and a small amount of mild dish detergent, then let it dry completely before reinstalling. Replace any filters that smell musty. Washing alone won't always eliminate mold that's embedded in filter fibers. If the odor persists after cleaning the container and swapping filters, check inside the hose and brush head cavity for trapped wet debris or mold growth.
Unusual loud noises
A sudden change in sound (grinding, rattling, high-pitched whining) means something is physically wrong, and you should stop using the vacuum right away. Continuing to run it risks turning a minor issue into a dead motor.
Unplug the machine and check the brush roll for trapped debris like coins, small toys, or gravel caught between the roller and the housing. Check the roller for resistance, which points to worn bearings. Rattling often comes from a loose component: a detached hose fitting, a cracked fan housing, or a baseplate screw that's backed out. If the noise is coming from inside the motor housing and nothing external is loose or jammed, the motor bearings are likely worn, and professional service or replacement is the next step.
Step-by-step: how to clear a clogged hose safely
Disconnect the vacuum from power and detach the hose from both connection points. Hold one end up to a light source and look through it. You'll be able to see exactly where the blockage sits if light can't pass through.
Push the clog out gently from one end using a long, blunt object. Push steadily rather than jabbing, and avoid anything sharp that could puncture the hose wall and create a permanent air leak.
Once the clog is out, check your owner's manual to see if the hose can be rinsed with warm water. Let it dry completely before reattaching. A damp hose traps dust on its interior walls and can create a new blockage within a few uses, so give it a full day to air out if possible.

Washable vs disposable filters: which saves more money?
Washable filters save more money over the life of a budget vacuum, but only if you actually maintain them correctly. Most affordable vacuums use both types, and understanding which one does what keeps your costs low and your motor protected.
Washable foam and felt pre-motor filters
Budget models from Bissell, Shark, Eureka, and Dirt Devil almost always include a washable foam or felt filter that sits between the dust bin and the motor. These pre-motor filters cost nothing to maintain. You rinse them under cool water, let them air-dry for a full 24 hours, and reinstall. No replacement purchases, no hunting for the right part number.
The catch with washable filters is discipline. Reinstalling one before it's bone dry invites mold growth inside the filter housing and pushes moisture toward the motor, which can cause damage that ends the machine's life. If you vacuum frequently enough that waiting a full day feels impractical, a spare filter set lets you rotate between a clean dry set and one that's drying on the counter.
Disposable HEPA post-motor filters
Most budget vacuums pair that washable pre-motor filter with a disposable HEPA filter cartridge positioned after the motor. This post-motor filter catches the finest particles before exhaust air re-enters your room, and it can't be washed. You replace it every 6–12 months based on how often you vacuum and whether you have pets.
Vacuum Spot recommends buying OEM filters directly from your vacuum's dealer rather than generic alternatives. Third-party filters may not seal properly against the housing, which lets fine dust bypass the filter entirely and reach the motor. You save a few dollars per filter but risk shortening the motor's life — a bad trade on a machine you're trying to keep running for years. If you're shopping for a vacuum where HEPA filtration matters for allergies, the affordable vacuums with HEPA filters roundup covers models where replacement cartridges stay reasonably priced.
The best long-term cost balance
Your lowest total filter cost comes from a vacuum that pairs a washable primary filter with an affordable OEM HEPA cartridge. You pay nothing for day-to-day filtration maintenance and just the cost of a HEPA swap once or twice a year.
Before you buy any budget vacuum, check the price and availability of its replacement HEPA filter on Amazon or the manufacturer's site. A cheap machine with an expensive or hard-to-find proprietary filter costs more over time than a slightly pricier vacuum with a filter you can order anytime. Filter economics are part of the purchase decision, not an afterthought.

When should you repair vs replace a budget vacuum?
The general guidance from vacuum maintenance experts is straightforward: consider replacing when repair costs exceed the price of a mid-tier new unit, when performance keeps declining despite consistent upkeep, or when replacement parts are no longer available for your model.
Cheap fixes that add years of life
Some repairs cost so little that skipping them is throwing the whole machine away over pocket change. A new vacuum belt is one of the cheapest and simplest fixes on most budget uprights. That single swap can restore a brush roll that stopped spinning and bring back the carpet agitation you've been missing. Brush roll replacement and fresh filters are also inexpensive fixes that keep a budget machine running well past the point where most people give up on it.
All three of those fixes address the most common performance complaints (weak pickup, roller not turning, reduced airflow) and none of them come close to the cost of a replacement on any machine over $40. If one of these parts is the problem, fix it.
Signs it's time to let go
Motor failure is the line you can't cross economically on a budget machine. If you hear persistent grinding from the motor housing after clearing every blockage and replacing the belt, the internal bearings are worn beyond what a simple part swap can fix. A burning smell that doesn't go away once you've confirmed the airflow path is clear points to the same problem. The motor is overheating from internal damage, not from a clog you missed.
MetroVac's guidance on replacement is clear: when repairs cost more than a comparable new unit, when performance keeps dropping despite maintenance, or when parts have been discontinued, your money goes further toward a new machine. Before you decide either way, check what your vacuum warranty actually covers. Some manufacturers replace motors or electrical components within the warranty window at no cost, which changes the math entirely.
What to look for in a maintenance-friendly budget vacuum
The easiest budget vacuum to maintain is one designed so you can access every serviceable part without tools, guesswork, or a YouTube tutorial. Before you buy, check these five features that separate a machine you'll keep running for years from one that becomes a chore to care for.
Tool-free brush roll removal
You need to pull hair and debris off the roller regularly, so look for a design that lets you pop it out with a latch or twist mechanism instead of unscrewing a baseplate. If removing the brush roll requires a Phillips head and ten minutes on the floor, you're far less likely to do it on schedule. Many budget uprights from Bissell and Shark now include quick-release brush rolls. Check the product listing or manual before buying to confirm.
Washable primary filters that are easy to find and remove
Your primary filter should slide out of a clearly marked compartment without disassembling the housing. Hoover, Eureka, and other affordable brands typically label the filter door on the dust cup or motor housing, so you can pull, rinse, and dry the filter in under a minute. Avoid any model where reaching the filter requires removing multiple panels. That friction turns a simple task into something you'll skip.
Transparent dust bin with a visible max fill line
A clear bin takes the guessing out of when to empty. Many machines include a capacity marker printed directly on the container, and you want one that's easy to read at a glance. Opaque bins hide how full they are, which means you'll either empty too often or, more likely, wait too long.
Affordable, readily available replacement parts
Search Amazon or the manufacturer's website for replacement belts, filters, and brush rolls before you commit to a purchase. If the parts are in stock and sold by multiple sellers, you're in good shape. A vacuum with proprietary parts that are hard to source or overpriced turns every routine repair into a reason to throw the whole machine away. Shark and Bissell tend to have wide parts availability because of their large install base.
A clear owner's manual with a maintenance schedule
Look for a manual that includes an actual table or checklist telling you what to clean, inspect, and replace, and how often. Manuals from Bissell, Shark, Hoover, and Eureka commonly include this kind of schedule with specific intervals for filter washing, belt checks, and brush roll service. If the manual is a single folded sheet with no maintenance guidance, that's a sign the manufacturer doesn't expect the machine to last long enough to need it.
You can check most of these features from the product listing page without buying first. Scroll through the photos for a transparent bin and quick-release brush roll, download the manual PDF if it's available, and search for replacement parts by model number. Five minutes of research before checkout saves you from owning a vacuum that's impossible to keep alive. If you're shopping for something compact, the best cordless stick vacuums for studio apartments and lightweight vacuums under 8 pounds roundups flag which models check these maintenance-friendly boxes.
Pet owners: extra maintenance steps to prevent early failure
Pet hair demands a faster maintenance cycle than the standard schedule covered above. MetroVac notes that pet homes and heavy-debris environments shorten vacuum lifespan, so every interval needs to move to the aggressive end of the range. Filters should be cleaned or replaced every 3 months instead of 6, and a thorough inspection or tune-up belongs on a 12-month cycle rather than stretching to 24. If you follow the general schedule in a home with shedding animals, you're already behind.
Cut hair from the brush roll frequently
Fur wraps tighter and faster than human hair, and it winds around the brush roll end caps where the bearings sit. Waiting for the standard cleaning interval is too long in a pet household. By then, the tangle is dense enough to grind against the bearings on every rotation. Flip the vacuum over often and snip the wrap before it has a chance to build up. Your brush roll spins freely, the belt stays intact, and you avoid the bearing damage that leads to grinding noises and eventual motor failure. The cat vs dog hair vacuum features guide covers which roller designs resist tangling better if you're still shopping.
Empty bagless bins after every session
Loose fur compresses inside the dust bin and blocks airflow faster than regular household dust. A container that looks half-full of fur can already be restricting the air path enough to make the motor run hotter. Don't judge by the fill line alone in a pet home — empty it after every session regardless of how full it appears.
Change vacuum bags more frequently
Denver Vacuum Store notes that pet hair, dander, and fine particles fill bags faster than typical debris. The standard bag-replacement rule still applies, but you'll hit that threshold sooner — sometimes after just a few rooms instead of a full house. Check the bag before every use and don't push it to the limit. Fine dander clogs bag pores even when the bag doesn't look packed, silently choking suction between changes.
Keep a dedicated pet hair tool handy
A small handheld vacuum for pet hair handles furniture, stairs, and car seats without running your main machine on every surface. Spreading the workload across two inexpensive tools means less wear on your primary vacuum's motor and fewer emergency clogs from upholstery fur jamming the main hose.
Treating your vacuum like it lives in a pet-free home when it doesn't is the fastest way to kill it early. Shorter intervals on every maintenance task (filters, bin, brush roll, bags) keep the motor cool and the airflow open, which is what keeps the motor alive when fur is involved.

Proper vacuuming technique: yes, it affects longevity
How you push your vacuum across the floor changes how hard the motor works and how fast parts wear out. Using the wrong motion pattern for your machine type adds unnecessary strain on every pass, and over hundreds of sessions, that wasted effort shortens the motor's useful life.
Single-motor vacuum uprights, the most common type in the budget range, perform best with a "saw-cut" motion: short, overlapping back-and-forth strokes that let the brush roll agitate carpet fibers without dragging the motor through long, heavy pulls. You're covering small sections thoroughly rather than making sweeping passes across the room. Dual-motor vacuums, which use separate motors for suction and the brush roll, handle long overlapping passes better, similar to how you'd mow a lawn in parallel rows. Matching your technique to the motor configuration reduces wasted energy on every cleaning session.
Height adjustment matters just as much as your stroke pattern. Running the vacuum head too low on hard floors grinds the bristles flat against the surface, wearing them down prematurely and adding unnecessary friction. Too high on carpet creates a gap between the brush and the fibers, which reduces pickup and makes you go over the same spot repeatedly, doubling the runtime and the wear on every moving part. Denver Vacuum Store lists incorrect height as one possible cause of poor cleaning performance. If you switch between carpet and hard floors, adjust the setting each time you change surfaces. For hard-floor-only homes, the best hardwood floor vacuums under $120 roundup covers models designed to handle that surface without bristle damage.
Frequently asked questions
How long should a budget vacuum cleaner last with proper maintenance?
Most budget vacuums can run 5 to 8 years with consistent upkeep, according to maintenance specialists at MetroVac. Pet homes and heavy-use households will land closer to the lower end of that range.
How often should I clean or replace my vacuum filter?
Washable foam or felt filters on brands like Bissell or Shark need rinsing every 1 to 3 months, depending on how often you vacuum. Non-washable HEPA cartridges typically need full replacement every 6 to 12 months, depending on usage and the model. Always let a washed filter air-dry for a full 24 hours before reinstalling. Putting it back damp is a fast track to mold and motor problems.
When should I change my vacuum bag?
Denver Vacuum Store, citing vacuum manufacturers, recommends swapping the bag when it hits half to two-thirds full, not when it's stuffed to the brim. Fine dust particles block airflow long before the bag looks completely packed.
Can I wash my vacuum's HEPA filter with water?
HEPA filter cartridges in most budget vacuums are not designed to get wet and will lose their filtration ability permanently if washed. Check your owner's manual for the specific filter part number and care instructions. When in doubt, replace it rather than risk pushing unfiltered air back into your room.
Why does my vacuum smell bad when I use it?
A musty or pet-like odor usually means trapped debris is decomposing inside the bin, bag, or filter. Vacuuming up anything damp accelerates this. Empty the bin, wash any washable filters, and wipe down the inside of the dust container with mild soap to kill the smell at the source.
How do I know if my vacuum belt needs replacing?
If the brush roll has stopped spinning even though the motor runs, the belt is almost certainly stretched, cracked, or snapped. A burning rubber smell during use is another dead giveaway. Belts for budget uprights from Hoover or Eureka typically cost just a few dollars and take minutes to swap.
Is it worth repairing a cheap vacuum or should I buy a new one?
If the fix is a belt, filter, or brush roll, repair is almost always cheaper than replacement. But once you're looking at motor failure or parts that have been discontinued, the repair cost can easily exceed what a new budget unit costs. MetroVac's guidance is straightforward: if the repair bill approaches the price of a mid-tier new vacuum, replace it.
How often should I empty a bagless vacuum's dust bin?
Consumer Reports recommends emptying it after every single use, regardless of how full it looks. Most bagless models from Shark, Bissell, and similar brands have a max fill line printed on the bin. Treat that as a hard limit, not a suggestion.
Do generic vacuum filters and bags damage the motor?
They can. Poorly fitting third-party filters may leak dust past the seal, sending fine particles straight into the motor housing. OEM filters designed for your specific model maintain the tight fit needed to protect airflow and filtration. The savings from generic parts aren't worth it if they shorten your vacuum's life.
What maintenance does a robot vacuum need?
Robot vacuums like Roomba models need regular dustbin emptying, side brush replacement, sensor wiping, and filter cleaning, even models with self-emptying docks. Hair tangles around the main brush roll just as fast as on a traditional vacuum. Self-emptying docks also have their own bags or chambers that need periodic attention, so "autonomous" doesn't mean maintenance-free.